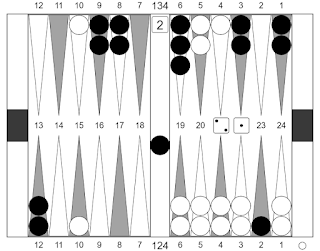
Position 341
How should White play 65 here?

Whatever you decide to do here, it is
important to keep your 21 point anchor. It is your insurance against disaster –
here that means not being blitzed and closed out.
When this happened over the board, White was confused about what to do, so he figured that he might as well put his opponent on the bar and played 6/1* 13/7:

This may put your opponent on the bar,
but it gives them a direct shot from the bar at the blot on your 1 point as
well as indirect shots.
The other problem with this play is
that it leaves 3 blots around the board. Even if you are missed, you may not be
able to tidy them all up. This play is too big.
It would be nice to make a useful point if you are missed, so you consider 13/8 13/7:

This does duplicate Blacks 6’s to hit
both checkers, but things can go very wrong for you here, just because you are
still leaving 2 blots.
The more blots you get sent back, the
more checkers you will have back. The more checkers you have back, the more
running Gammons or normal Gammons you can lose.
This also strips your 13 point, when
you would like to keep a spare on it for flexibility.
Consider 13/2:

This also leaves 2 blots and has the
same problem with gammon losses. This at least keeps a spare on your 13 point.
Consider 13/7 11/6:

This play reduces your blot count to
only one, which minimises your gammon losses if you have only one checker for Black
to hit.
It also keeps a spare on your 13
point.
Sometimes you just have to make the play that minimises the damage to your position, this is one such occasion.


Comments
Post a Comment